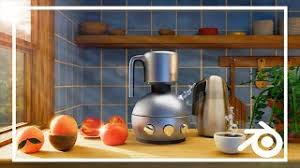
Hey everyone, your guide from Blender Aday here. Let’s dive right into a project that’s both challenging and incredibly rewarding. If you’re looking to create photorealistic renders, one of the best ways to practice is by building a complete scene from scratch. Today, we’re going to tackle how to create compelling Keto Recipes Blender scenes in 3D. You might be wondering, why that specific theme? Because it allows us to combine hard-surface modeling for the kitchen appliances, organic modeling for the food, and even a little fluid simulation for the final product. It’s a complete workout for your 3D skills, and by the end of this guide, you’ll have a portfolio-ready piece and a much deeper understanding of Blender’s powerful toolset.
What is a Photorealistic Render in Blender?
A photorealistic render is a 3D image that is so convincing it could be mistaken for a real photograph. This isn’t about a single button or setting; it’s the culmination of accurate modeling, realistic materials, believable lighting, and a thoughtful composition. For our keto recipes blender scene, this means making the glass of the blender jar look like real glass, the avocado skin look rough and bumpy, and the light from the kitchen window cast soft, natural shadows across the countertop. We achieve this by paying close attention to the details that our eyes perceive in the real world.
Why You Should Master a Keto Recipes Blender Scene
Mastering a project like this is a fantastic milestone for any 3D artist. It’s a comprehensive exercise that forces you to move beyond modeling a single object in isolation. You learn how different elements interact, how light bounces between surfaces, and how to tell a small story with your composition. A well-executed keto recipes blender scene demonstrates proficiency in several core areas:
- Hard-Surface Modeling: Creating the clean lines and precise shapes of the blender appliance.
- Organic Modeling: Sculpting and modeling natural ingredients like spinach, berries, or an avocado.
- Material Creation: Using Blender’s node system to build complex shaders for glass, plastic, metal, and food.
- Lighting and Composition: Arranging your scene to create a visually appealing and realistic image.
- Rendering: Understanding the differences between Cycles and Eevee to get the best possible result.
This project is a perfect portfolio piece because it showcases a wide range of your abilities in a single, cohesive image.
Step-by-Step: Building Your 3D Blender Scene
Ready to get your hands dirty? Let’s break down the process. We’ll be working from the ground up, starting with the basic shapes and adding detail as we go.
Step 1: Blocking Out the Scene
Before you model a single detail, start with simple cubes and cylinders. This is the “blocking” phase. The goal here is to establish the scale and composition of your scene.
- Create a cube for the countertop and another for the wall or backsplash.
- Use a cylinder for the approximate size and position of the blender base and another for the jar.
- Add smaller spheres or cubes to represent your keto ingredients. Where will the avocado sit? Where is the bowl of berries?
- Set up a preliminary camera angle. This is crucial. You should model and texture with your final shot in mind.
Think of this stage like a pencil sketch. It’s rough, fast, and allows you to experiment with different layouts without committing hours to detailed modeling. Getting the composition right now will save you a lot of headaches later.
Step 2: Modeling the Star – The Blender Appliance
The blender is our hero object. We’ll focus on clean topology and believable details.
- The Base: Start with a cylinder. Use Loop Cuts (Ctrl+R) to add divisions where the shape changes. Use Extrude (E) and Scale (S) to form the main body. For buttons, you can either model them as separate objects or use inset faces (I) to create the indentations.
- The Jar: This is a great exercise in glass modeling. Again, start with a cylinder. Shape the pitcher using loop cuts and scaling. Use a Solidify Modifier to give the glass real thickness, which is essential for realistic light refraction.
- The Blades: These can be modeled from a simple plane. Extrude the edges to create the blade shape, add a Solidify Modifier for thickness, and a Bevel Modifier (Ctrl+B on edges) to catch the light on the sharp edges.
Step 3: Crafting the Keto Ingredients
Now for the fun part—the organic elements. This is where you can use Blender’s sculpting tools.
- Avocado: Start with a UV sphere. Go into Sculpt Mode and use the Grab brush to pull it into a more pear-like shape. For the skin texture, you can use a displacement map or finely sculpt it using a textured brush.
- Berries: These are simple spheres with a bit of imperfection. Use a procedural noise texture in the shader editor or a displacement modifier to give them a slightly bumpy, natural surface. For the top where the stem was, you can use a boolean or sculpt a small indent.
- Spinach: This is best done with a plane. Give it a few subdivisions, then use Proportional Editing (O) to create gentle, leaf-like waves and folds.
|
Our Picks for the Best Blender in 2025
As an Amazon Associate, we earn from qualifying purchases.
|
||
| Num | Product | Action |
|---|---|---|
| 1 | BlenderBottle Classic V2 Shaker Bottle Perfect for Protein Shakes and Pre Workout, 28-Ounce, Clear/Black |

|
| 2 | BLACK+DECKER PowerCrush Multi-Function Blender with 6-Cup Glass Jar, 4 Speed Settings, Silver |
|
| 3 | Ninja Professional Blender 1000W, Total Crushing Technology- Smoothies, Ice Crushing & Frozen Fruit, Full-Size Countertop Blender, 72-oz. Pitcher, Black & Grey, BL610 |
|
| 4 | Zulay Kitchen Milk Frother Wand Drink Mixer with AA Duracell Batteries- Durable Handheld Milk Frother Electric Whisk - Easy-Clean Milk Frother Wand & Mini Blender - Electric Coffee Frother - Black |
|
| 5 | Ninja Blender, Compact Kitchen System, 1200W, 3 Functions for Smoothies, Dough & Frozen Drinks with Auto-IQ, 72-oz.* Blender Pitcher, 40-oz. Processor Bowl & 18-oz. Single-Serve Cup, Grey, AMZ493BRN |
|
| 6 | BLACK+DECKER 10-Speed Countertop Blender, BL2010BP, 6-Cup Plastic Jar, Dishwasher-Safe, Stainless Steel, Suction Feet |
|
| 7 | KOIOS Smoothie Blender, 900W Personal Blender for Shakes and Smoothies for Kitchen with 2 No-BPA 22oz Portable Cups, Single Serve Smoothies Maker Mixer for Juices, Nutritious Recipe (Grey Blue) |
|
| 8 | Ninja | Blender | Nutri Pro | Single Serve | For Smoothies, Salsa, Shakes and Frozen Drinks | Includes 2 Smoothie Cups & Lids | Crushes Ice, Fruit & Veggies |Silver | BN401 |
|
| 9 | nutribullet Personal Blender, Shakes, Smoothies, Food Prep, and Frozen Blending, 24 Ounces, 600 Watt, Gray, NBR-0601WM |
|
| 10 | Magic Bullet Blender, Small, Silver, 11 Piece Set |
|
Pro Tips for Hyper-Realistic Keto Recipes Blender Renders
Getting the models right is only half the battle. The magic happens in the shading and lighting. Here are some pro tips to elevate your keto recipes blender project.
How to Master Materials with Nodes
The Shader Editor is your playground. Don’t just rely on basic colors.
- Subsurface Scattering (SSS): For ingredients like berries or leafy greens, SSS is a must. It simulates how light penetrates the surface of an object, scatters inside, and then exits. In the Principled BSDF node, increase the Subsurface value slightly and pick a color that matches the ingredient’s interior. This will give it that soft, translucent look of real food.
- Glass Shader: For the blender jar, set the Transmission on the Principled BSDF to 1.0 and the Roughness to a very low value, like 0.05. The Index of Refraction (IOR) for glass is typically 1.45.
- Procedural Textures: Use Noise, Musgrave, and Voronoi textures to add subtle surface imperfections to everything. Nothing in the real world is perfectly clean or smooth. Plug these textures into the Roughness or Bump inputs of your shaders to add fingerprints, smudges, and micro-scratches.
Why is Lighting So Important for Realism?
Lighting sets the mood and reveals the form and texture of your objects. A common beginner mistake is using a single, harsh light source.
Alex Chen, a senior 3D artist, often says, “Bad lighting can make a great model look terrible, but great lighting can make a simple model look stunning. It’s the most important element for realism.”
Start with an HDRI (High Dynamic Range Image) for ambient world lighting. You can get free ones from sites like Poly Haven. This provides realistic environmental reflections. Then, add a key light, like an Area Light positioned to simulate a window, to create soft shadows. You might add a smaller, less intense fill light to brighten up some of the darker areas.
Common Mistakes to Avoid in Food Visualization
When creating a keto recipes blender scene, a few common pitfalls can shatter the illusion of realism.
- Overly Perfect Models: Everything is too symmetrical, too clean. Use proportional editing or the sculpt grab brush to add slight imperfections.
- Flat Textures: The materials lack depth. Always use roughness and bump/normal maps to simulate surface detail. A countertop isn’t a single color; it has tiny variations.
- Sharp Edges: In the real world, even the sharpest edges have a tiny bevel that catches the light. Use the Bevel Modifier on your hard-surface models to add this subtle but crucial detail.
- Ignoring Composition: A technically perfect render can still be boring. Use the rule of thirds or leading lines to guide the viewer’s eye through the scene.
FAQ: Your Keto Recipes Blender Scene Questions Answered
Q: What is the best render engine for a realistic keto recipes blender scene, Cycles or Eevee?
A: For maximum photorealism, Cycles is the superior choice. Its path-tracing engine accurately simulates how light bounces, which is crucial for materials like glass and food with subsurface scattering. Eevee is great for faster previews, but Cycles will deliver the most convincing final image.
Q: How can I create realistic condensation on the outside of the blender jar?
A: You can achieve this using a particle system. Create a small droplet object (a simple icosphere). Then, select your blender jar, add a particle system, set it to Hair, and under the Render panel, choose to render as your droplet Object. Use a weight paint map to control where the droplets appear most densely.
Q: Should I use pre-made 3D models for my scene?
A: Using pre-made assets from a site like BlenderKit or a paid marketplace is a great way to save time, especially for background elements. However, for a portfolio piece, it’s highly recommended to model the main “hero” objects, like the blender itself, from scratch to demonstrate your own modeling skills.
Q: How do I make the smoothie inside the blender look realistic?
A: For a static image, you can model the liquid’s shape. For the material, use the Principled BSDF with a high transmission value and some subsurface scattering to give it a thick, opaque look. Mix in a Noise texture to vary the color slightly, suggesting blended ingredients.
Q: My render is too noisy. How do I fix it?
A: Noise is common in Cycles, especially with complex lighting and materials. You can increase the sample count in the Render Properties panel. More importantly, enable Blender’s built-in Denoise functionality under the Render tab. The OpenImageDenoise option works wonders for final renders.
Conclusion: Your Journey into Photorealism
We’ve covered a lot of ground, from initial blocking and hard-surface modeling to the nuances of lighting and material creation. Building a complete keto recipes blender scene is an ambitious but incredibly valuable project. It ties together almost every fundamental skill in 3D art. Remember that photorealism is a journey of observation. Look at how light interacts with objects in your own kitchen. Notice the imperfections, the textures, the way shadows fall. The more you observe, the better you’ll be able to replicate it in Blender. Now, it’s your turn. Open up Blender, start blocking out your scene, and create something delicious.