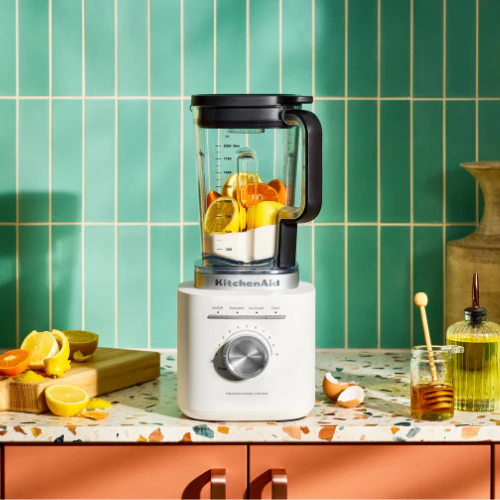
Hey everyone, and welcome back to Blender Aday! It’s your guide here, ready to dive into another project. Have you ever looked at a simple, everyday process and thought, “I wonder if I could recreate that in 3D?” Today, we’re doing just that. We are going to craft the perfect Guacamole Recipe Blender scene, not in the kitchen, but right inside Blender. This isn’t just about making digital food; it’s a fantastic exercise in organic modeling, complex material creation, and photorealistic rendering that will seriously level up your skills. Forget your apron—fire up your PC, and let’s get started.
What is a Photorealistic Food Render?
A photorealistic food render is a 3D creation designed to look indistinguishable from a real photograph of food. It’s an art form that tests your ability to replicate complex organic shapes, intricate textures, and the subtle interplay of light with different materials. Our guacamole recipe blender project is a prime example. We’re not just making a green blob; we’re capturing the lumpy texture of the avocado, the translucency of the onion, the wetness of the tomato, and the way light scatters through the final delicious mixture. It’s a challenge that pushes tools like Cycles and the shader node editor to their limits.
Why Your Portfolio Needs a Guacamole Recipe Blender Project
You might be wondering, “Why focus on a guacamole recipe blender scene?” The answer is simple: versatility. Mastering a project like this demonstrates a wide range of highly sought-after 3D skills. Product visualization, for instance, often involves creating appealing shots of food and drink for advertising. Architectural visualization artists need to populate their scenes with realistic assets, including food. By tackling this, you’re not just learning to make guacamole; you’re learning advanced techniques in:
- Organic Modeling and Sculpting: Creating the non-uniform shapes of avocados, tomatoes, and cilantro.
- Procedural Texturing: Building complex, realistic food materials from scratch using nodes, which is more flexible than relying on image textures.
- Subsurface Scattering (SSS): A key material property that makes things like onions, limes, and the guacamole itself look soft and fleshy rather than like hard plastic.
- Lighting for Realism: Understanding how to light a scene to emphasize texture and translucency, making the final render look appetizing.
In my own projects, I’ve found that having a stunning food render in my portfolio is a great conversation starter with potential clients. It immediately shows a high level of technical skill and an eye for detail.
The Step-by-Step 3D Guacamole Recipe Blender Workflow
Alright, let’s break down the recipe for 3D success. This is our workflow for creating a mouth-watering render from a default cube.
Step 1: Gathering Your Digital Ingredients (Modeling)
Before we can blend anything, we need our ingredients. This stage is all about modeling.
- The Avocado: Start with a UV sphere. Use Proportional Editing (O) in Edit Mode to pull and shape it into that classic pear shape. For the bumpy skin, you can use a displacement modifier with a procedural noise or Voronoi texture. To create the inside, duplicate the avocado, scale it down slightly, and use a Boolean modifier to cut it in half. The pit is another simple UV sphere.
- The Onion and Tomato: These are also variations of a UV sphere. The key is to add subtle imperfections. Use the Sculpt Mode with a low-strength brush to add small dents and irregularities. For the diced onion, you can model one small piece and use a particle system or geometry nodes to scatter it.
- The Cilantro: This is a perfect use case for curves. Create a single leaf shape from a plane, then use a Curve object with a bevel profile to create the stem. You can then array these along another curve to form a bunch.
- The Blender (Appliance): This is a hard-surface modeling challenge. Break it down into simple parts: the base, the glass pitcher, the lid, and the blades. Use basic shapes like cylinders and cubes with a Subdivision Surface modifier. Add supporting edge loops (Ctrl+R) to keep your edges sharp and clean.
Step 2: The Perfect Mix (Texturing and Shading)
This is where the magic happens. We’ll use the Shader Editor to bring our models to life.
- Avocado Skin: Use a Noise texture plugged into the Bump node to get that rough texture. Mix dark green and brownish colors using another, larger-scale Noise texture as the factor in a Mix RGB node.
- Avocado Flesh: The most important node here is Subsurface Scattering. Set the base color to a light, yellowish-green. Then, increase the Subsurface value in the Principled BSDF shader. Play with the Subsurface Radius values (give the green channel a slightly higher value) to control how light penetrates the surface, giving it that soft, fleshy look.
- Tomato and Onion: These also rely heavily on SSS. For the onion’s layers, you can use a Wave texture or Gradient texture to subtly change the color and translucency from the center outwards.
- Glass Pitcher: For the blender’s glass, use the Principled BSDF. Turn the Transmission value all the way up to 1.0 and lower the Roughness to something like 0.05 for a clean, clear look. If you’re using Cycles, this will work perfectly. For Eevee, you’ll need to enable screen space reflections and refraction in the render settings.
|
Our Picks for the Best Blender in 2026
As an Amazon Associate, we earn from qualifying purchases.
|
||
| Num | Product | Action |
|---|---|---|
| 1 | Ninja | Blender | Nutri Pro | Single Serve | For Smoothies, Salsa, Shakes and Frozen Drinks | Includes 2 Smoothie Cups & Lids | Crushes Ice, Fruit & Veggies |Silver | BN401 |

|
| 2 | nutribullet Personal Blender, Shakes, Smoothies, Food Prep, and Frozen Blending, 24 Ounces, 600 Watt, Gray, NBR-0601WM |
|
| 3 | KOIOS Smoothie Blender, 900W Personal Blender for Shakes and Smoothies for Kitchen with 2 No-BPA 22oz Portable Cups, Single Serve Smoothies Maker Mixer for Juices, Nutritious Recipe (Grey Blue) |
|
| 4 | Ninja Blender, Compact Kitchen System, 1200W, 3 Functions for Smoothies, Dough & Frozen Drinks with Auto-IQ, 72-oz.* Blender Pitcher, 40-oz. Processor Bowl & 18-oz. Single-Serve Cup, Grey, AMZ493BRN |
|
| 5 | BlenderBottle Classic V2 Shaker Bottle Perfect for Protein Shakes and Pre Workout, 28-Ounce, Clear/Black |
|
| 6 | BLACK+DECKER PowerCrush Multi-Function Blender with 6-Cup Glass Jar, 4 Speed Settings, Silver |
|
| 7 | Magic Bullet Blender, Small, Silver, 11 Piece Set |
|
| 8 | Ninja Professional Blender 1000W, Total Crushing Technology- Smoothies, Ice Crushing & Frozen Fruit, Full-Size Countertop Blender, 72-oz. Pitcher, Black & Grey, BL610 |
|
| 9 | BLACK+DECKER 10-Speed Countertop Blender, BL2010BP, 6-Cup Plastic Jar, Dishwasher-Safe, Stainless Steel, Suction Feet |
|
| 10 | Zulay Kitchen Milk Frother Wand Drink Mixer with AA Duracell Batteries- Durable Handheld Milk Frother Electric Whisk - Easy-Clean Milk Frother Wand & Mini Blender - Electric Coffee Frother - Black |
|
Step 3: Simulating the Blend (Creating the Guacamole)
Creating the final, chunky guacamole is the centerpiece of our guacamole recipe blender scene. You have a few options here:
- Sculpting: The most direct method. Take a sphere, give it a lot of geometry (or use the Multiresolution modifier), and start sculpting. Use brushes like the Draw, Blob, and Clay Strips brushes to build up a lumpy, uneven surface.
- Displacement: Use a combination of procedural textures (Noise, Musgrave) and apply them as a Displacement modifier to a highly subdivided mesh. This is a non-destructive way to get a complex base texture.
- Fluid Simulation (Advanced): For an animation, you could use Blender’s Mantaflow fluid simulator to actually blend the ingredients. However, for a still image, this is often overkill.
For the material, start with the avocado flesh shader and add in small “chunks” of tomato and onion. You can do this by mixing in red and white colors using a Voronoi texture (set to Distance to Edge) as a mask. This will create small, cell-like shapes. Increase the roughness to make it look less like plastic and more like a creamy paste.
Step 4: Setting the Mood (Lighting and Composition)
Your models and materials can be perfect, but poor lighting will ruin the shot.
- Lighting: A classic three-point lighting setup works well. Use a large Area Light as your key light to create soft shadows, a fill light on the opposite side with lower intensity, and a rim light from behind to highlight the edges of the blender and ingredients. Using an HDRI for ambient light can also add a huge amount of realism.
- Camera: Choose a focal length that feels natural, like 50mm or 85mm. Use a shallow depth of field (a low f-stop value in the camera settings) to blur the background and draw the viewer’s eye to your beautiful guacamole.
- Rendering: For food, Cycles is often the best choice. Its path-tracing engine calculates light bounces more accurately, which is crucial for getting that SSS to look just right. Don’t be afraid to let it render for a while with a higher sample count to get a clean, noise-free image.
“Creating photorealistic food in Blender is the ultimate test of observation. You’re not just modeling an avocado; you’re recreating the story of its ripeness, its texture, and the way light interacts with it. A project like a guacamole recipe blender scene forces you to master the subtleties of light and material that separate good renders from great ones.” – Alex Chen, Senior 3D Artist
Pro Tips for an Extra Zesty Render
Want to push your scene even further? Try these advanced techniques.
- Imperfections are Key: Nothing in the real world is perfect. Add small scratches to the blender base, a slight smudge on the glass, or a small brown spot on an avocado. These details sell the realism.
- Add Condensation: Create a simple particle system on your glass pitcher and use a small, transparent sphere as the particle object. This creates the look of water droplets and adds a “freshly made” feel.
- Use Bevel Nodes: Instead of beveling all your model edges, use the Bevel node in your shader setup and plug it into the Normal input of your Principled BSDF. This is a great way to catch highlights on the edges of hard-surface models without adding extra geometry.
- Post-Processing: Use Blender’s Compositor to do your final color grading. A slight vignette, a touch of glare on the highlights, and subtle color correction can make your render pop.
Common Guacamole Recipe Blender Mistakes to Avoid
When working on a complex project like this, it’s easy to make a few common mistakes. Here’s what to watch out for:
- Materials Look Too ‘Plasticky’: This is usually caused by incorrect Roughness values or a lack of Subsurface Scattering. Food is rarely perfectly smooth or shiny. Use roughness maps to break up reflections.
- Flat, Uninspired Lighting: Avoid using a single, harsh light source. Soft, diffused lighting from multiple sources will better showcase the forms and textures of your ingredients.
- Overly Perfect Models: If every diced onion piece is a perfect, identical cube, the illusion is broken. Use randomization in your particle systems or geometry nodes to vary the scale and rotation of scattered objects.
- Ignoring Real-World Scale: Make sure your objects are modeled to their actual size. Blender’s physics and light calculations in Cycles work best with real-world units, which is crucial for a realistic guacamole recipe blender scene.
FAQ: Your Blender Food Rendering Questions Answered
How can I make my food textures look more realistic?
The key is layering. Use multiple procedural textures like Noise and Musgrave at different scales and mix them together. Plug these into the Base Color, Roughness, and Bump/Normal inputs of your Principled BSDF shader. Never rely on just one texture.
Is Cycles or Eevee better for food rendering?
For ultimate photorealism, especially with materials that use heavy Subsurface Scattering like our guacamole, Cycles is generally superior. Its path-tracing algorithm provides more accurate light interaction. Eevee can give you a fast preview, but for the final shot, Cycles is often worth the extra render time.
What is the best way to create small details like salt grains or spices?
A particle system is perfect for this. Model a single grain of salt or a flake of pepper, then use a particle system set to ‘Hair’ and ‘Render As Object’ to scatter thousands of them across your model. Use a weight paint map to control where they appear.
How do I make liquids like a squeezed lime juice look real?
For a small amount of liquid, it’s often easier to model it directly rather than using a fluid simulation. For the material, use a Glass BSDF or a Principled BSDF with full Transmission. Add a hint of color and play with the Index of Refraction (IOR) – for water, it’s 1.333.
My render is too noisy, how can I fix it?
Noise in Cycles is usually caused by complex lighting or materials like glass and SSS. The primary fix is to increase the render sample count. You can also use Blender’s built-in Denoising options (NVIDIA OptiX is very fast if you have an RTX card) in the Render Properties panel.
Your Turn to Create
We’ve walked through the entire process, from modeling the basic ingredients to the final, complex shading that makes a render truly delicious. Creating a guacamole recipe blender scene is more than just a fun project; it’s a comprehensive skills-builder. You’ve now got the recipe to tackle organic modeling, procedural texturing, and photorealistic lighting.
So, the next time you’re in the kitchen, take a closer look at the food around you. Observe the textures, the colors, the way light plays off the surfaces. Then, get back into Blender and try to recreate it. Now it’s your turn. Open up Blender, start experimenting, and don’t be afraid to make a mess. I can’t wait to see what you create.